Homemade Sauerkraut Recipe — with Caraway, Juniper and Bay
I have been working my way through a review of Bionsan's range of bio fermented products — hinojo lactofermentado (lacto-fermented fennel with apple vinegar, kefir water and coriander seeds), fermented carrot, fermented red beetroot, a chucrut mix, and kimchi. It was the fennel jar that started it all. When the last of them ran out, something clicked. I had a white cabbage sitting in the kitchen, airlock jars on the shelf from my fermenting series, and a Casa Adora August that was doing its usual impression of a proving oven. Time to make my own homemade sauerkraut recipe.
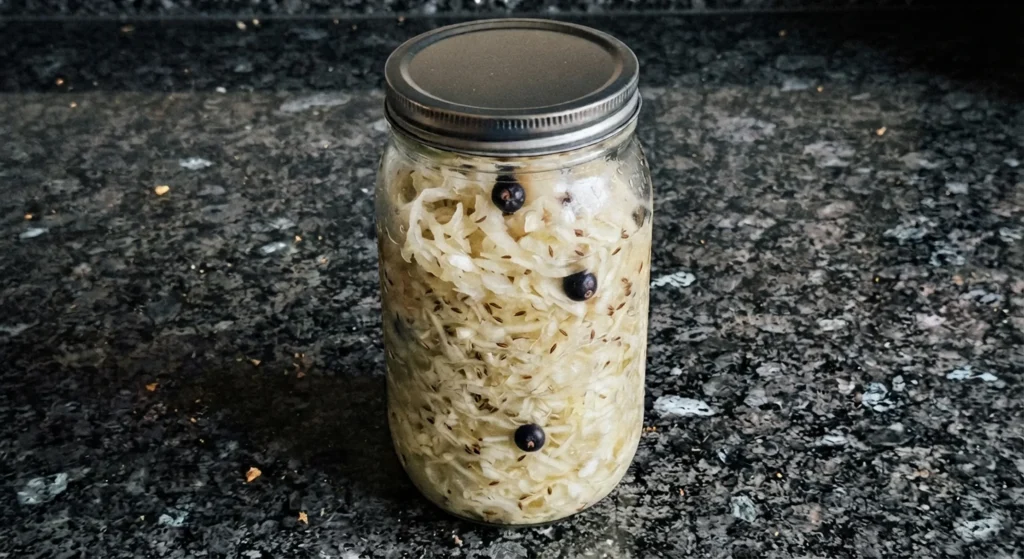
Kimchi was tempting — I enjoyed the Bionsan version — but I am short on a few ingredients, so that comes later. Sauerkraut is simpler, and the version I make is a long way from the plain two-ingredient kind. Caraway seeds, juniper berries and bay go in too, and the result is something with genuine depth: sour, aromatic, faintly resinous. The kind of thing you put on the side of almost anything and are glad you did.
How to Make a Homemade Sauerkraut Recipe — What You Need to Know
The process is lacto-fermentation: salt draws moisture from the cabbage, creating a brine in which naturally occurring lactobacillus bacteria convert the sugars into lactic acid. No vinegar, no heat, no additives. The salt and the lactic acid do the preserving, and the result is alive with beneficial gut bacteria.
At 2.5% salt to cabbage weight, this is a slightly saltier brine than the standard 2% — it gives a longer shelf life and a sharper, more complex flavour that suits the caraway and juniper well.
One thing worth knowing before you start: the Andalucían heat makes a difference. It is the 25th of August at Casa Adora and the temperature is sitting between 28 and 33°C — just a week ago it hit 41°C. In that kind of warmth, fermentation is active within 24 hours and the sauerkraut is pleasantly sour by day 7 or 8. In a cooler northern kitchen, you are looking at closer to 3–4 weeks. Taste from day 7 and move to the fridge when it is where you want it. I am leaving my second and third jars longer — a little more time in the warmth produces a more developed, complex result.
Equipment
Before anything else, sterilise your jars and weights. Hot soapy water, a thorough rinse, then into the oven at 100°C until completely dry. The oven drying is the critical step — any residual moisture can introduce unwanted bacteria. Airlock lids and rubber seals should not go in the oven; pour boiling water over them instead and leave to air dry.
- 4 x 750ml glass jars with weights and airlock lids
- Digital kitchen scales
- Large mixing bowl
- Sharp knife and chopping board (or mandolin)
Ingredients
Makes 2–3 x 750ml jars
- 1.5kg white cabbage (one large head), outer leaves reserved
- 38g fine sea salt (2.5% of cabbage weight)
Per 750ml jar:
- 1 bay leaf
- ¼ tsp caraway seeds
- 2–3 juniper berries
How to Make This Homemade Sauerkraut Recipe
Prepare the cabbage — Remove the outer leaves and set one or two aside — you will use them to cap the jars under the weights. Quarter the cabbage, remove the core, and shred finely with a sharp knife or mandolin. Weigh the shredded cabbage and adjust your salt if the weight differs from 1.5kg — you are aiming for exactly 2.5% salt to cabbage weight.
Salt and rest — Transfer the shredded cabbage to a large bowl, scatter over the 38g of sea salt, and toss well to coat. Leave to rest for 10–15 minutes. The salt will begin drawing moisture out of the cabbage during this time, which makes the next step considerably easier.
Massage — Get your hands in and massage the cabbage firmly for 8–10 minutes, squeezing and pressing until it has reduced significantly in volume and a good pool of liquid has formed at the bottom of the bowl.
Add the aromatics — Add the caraway seeds, juniper berries and bay leaves and work them through the cabbage evenly — roughly one bay leaf, ¼ tsp caraway seeds and 2–3 juniper berries per 750ml jar.
Pack the jars — Pack the cabbage into your sterilised jars firmly, pressing each layer down hard so the brine rises above the surface of the cabbage. The cabbage must stay submerged throughout fermentation. Tuck a reserved outer leaf over the top, then press the weight down to hold everything below the brine.
Ferment — Fit the airlock lids and place the jars somewhere out of direct sunlight at room temperature. In a warm kitchen, you will see bubbles within 24 hours. Check daily and press the cabbage down if it has risen above the brine. Taste from day 7. When the sauerkraut is pleasantly sour and the texture suits you, move to the fridge. It will keep for several months.
A Note on Timing
There is nothing wrong with opening the first jar at day 7 for a younger, milder sauerkraut — excellent alongside grilled fish or cold meats. The later jars, left for two to three weeks, will be sharper, more deeply flavoured, and better suited to long braises, pork dishes, or eating straight from the jar with bread and cheese. Both are right. They are just different things.
What Does Sauerkraut Go With?
Almost everything, once you get used to it. Pork is the obvious answer — sauerkraut and slow-cooked pork shoulder is hard to argue with — but it earns its place alongside grilled fish, added to a broth, stirred into a potato dish, or simply as a cold condiment with sharp cheese and good bread. The gut health benefits are present only in the raw, unpasteurised version — which is exactly what this is.
If you enjoyed my Bionsan fermented foods review and want to make more of what they sell, this homemade sauerkraut recipe is the logical next step. The kimchi will follow when I can source the gochugaru.
If you're interested in how sauerkraut fits into the broader picture of histamine and gut health, my Histamine Intolerance Symptoms — A Chef's Take on Fermented Foods covers the threshold principle and why fermented foods aren't the enemy.
This homemade sauerkraut recipe is part of my Gut Health Recipes collection — real food from a rural Andalucían kitchen, built around fermented foods, high-fibre pulses, wholegrains and prebiotic-rich ingredients. It also features in the Fermentation Hub and my Veggie & Vegan collections — the full range of lacto-fermented, cultured and plant-forward recipes from Casa Adora.
All recipe hubs → Recipe Hubs
Find more recipes and food adventures here.
Wonky photos, proper food, genuine adventures — The Flexible Chef